Meta launches new AI chatbot features: actively sending messages to improve interactive experience
1754
English
Currently, ComfyUI has officially launched the ComfyUI Desktop version, which can be installed like ordinary software programs and can be installed easily. If you are a Windows user, the following will bring you a tutorial guide to installing ComfyUI on Windows. This tutorial is mainly for the official portable version and other third-party installation methods.
ComfyUI Desktop version installation tutorial
Below is a hardware requirement form for ComfyUI compiled by me
| Components | Require |
|---|---|
| GPU | The graphics memory is at least 4GB or more. It is recommended to use NVIDIA graphics cards. It is recommended to use RTX3060 or more graphics cards. |
| GPUs with a memory less than 3GB can run through the --lowvram option, but performance may be degraded. | |
| CPU | Supports running on the CPU, but is slower, use the --cpu option. |
| Memory | It is recommended that the system memory is at least 8GB. |
| operating system | Supports Windows systems. |
| Mac installation instructions are provided for Macs equipped with Apple Silicon. | |
| Storage space | It is highly recommended to use a solid-state drive to speed up the loading and running of model files, and it is recommended to have at least 40GB of hard disk space. |
| Software dependency | You need to install a Python environment, but there is also an embedded Python environment in the installation package |
| Python libraries need to be installed, such as torch, transformers, etc. | |
| Some plugins may require Git to be installed. | |
| Remark | The specific requirements may change with the update of ComfyUI version, and it is recommended to view the official documentation. |
For hardware, it is recommended that you install ComfyUI first regardless of your computer configuration. If you find that the software is running at a low speed, then upgrade your hardware to improve the experience
This section will explain two ways to use third-party integration packages and use ComfyUI official installation packages for installation.
If you are first exposed to ComfyUI or don't want to spend too much time on environment configuration, it is strongly recommended that you directly use the integrated package to install it, which will save you a lot of configuration problems.
The following steps use the official installation package. ComfyUI officially provides an integrated package that can be run by downloading directly, but you need to install some additional model files.
ComfyUI official warehouse address: ComfyUI's Github warehouse You can find the blue link of Direct Link to download in the ReadMe section of the warehouse. Click to download the official integration package organized for you.

Unzip the integration package to the local directory where you want to install ComfyUI. The decompressed file should be the same as the one in the ComfyUI file directory.
Download the provided anything-v5-PrtRE.safetensors file from the network disk folder or download the Checkpoint checkpoint model from the model site such as civitai and liblib
Put the corresponding model into the ComfyUI directory models/checkpoints folder
ComfyUI_windows_portable
├──ComfyUI
│ ├── models
│ │ ├── checkpoints // Please put the big model file here
│ └── ...Other files are omitted
│ └── ...Other files are omitted
└── ...Other files are omitted
In the unzipped directory, you can see two files: run_cpu.bat and run_nvidia_gpu.bat. You can select to run them according to the instructions below.
ComfyUI_windows_portable
├── ...Other files are omitted
├── run_cpu.bat // Batch file, when your graphics card is A or only CPU, double-click to run it to start ComfyUI
└── run_nvidia_gpu.bat // Batch file. When your graphics card is N card (Nvidia), double-click to run it to start ComfyUI
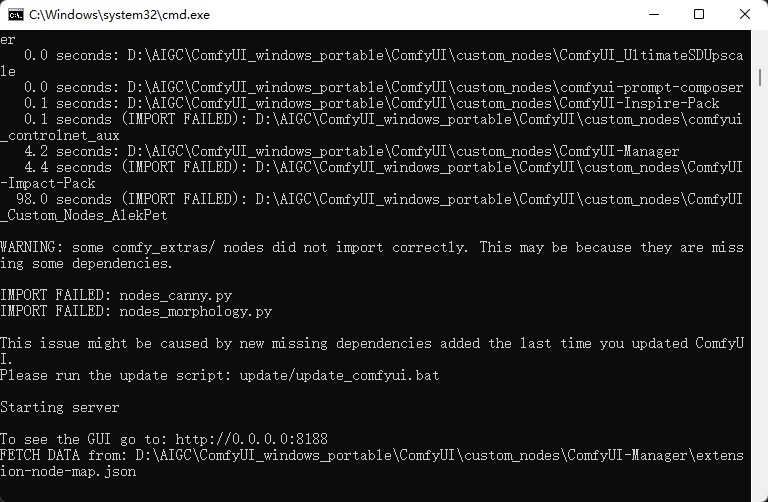
As shown in the picture above, when you see
Starting server
To See the GUI go to: http://0.0.0.0:8188 // The URL here may be displayed differently on the device
This means that ComfyUI has been started successfully. If the browser does not start normally, you can access the URL after To See the GUI go to: directly. For example, in the above example, it should be http://0.0.0.0:8188
By default, the default workflow of ComfyUI will be automatically loaded after startup, as shown in the figure below

If the interface shows blank or the default workflow is not loaded, please click Load default / Load default in the menu in the lower right corner to load the default workflow
If your browser only displays the web page title ComfyUI after opening, but does not have any GUI elements, this may be that your browser is incompatible. It is recommended to use the latest version of Chrome browser
First, you need to confirm that Load checkpoint in your workflow The model file loaded in it was loaded smoothly normally
If it is correct, you can click Add Prompt Queue / Queue Prompt
Wait for the run to complete, if everything goes well and the picture is generated, congratulations! You have completed the installation of ComfyUI and related basic content
Here, the reason for the ComfyUI integration package produced by Chinese domestic author @小威aaki :
Suitable for Windows systems
Supports Simplified Chinese, Traditional Chinese, English and Japanese
Integrate some commonly used ComfyUI plug-ins to avoid your time in exploration
Here I provide two versions
1. Qiuye’s A launcher’s separate file version is suitable for use with the official portable version of ComfyUI. You need to download additional models yourself.
2. The integrated package version contains some basic model resources. You can use it after downloading and decompressing.
Download address: https://drive.google.com/file/d/1nkNvE1Fnpeg3bZrdRAEpeWUx6jXS_GVn/view?usp=drive_link
How to use: After downloading, put it in the ComfyUI root directory. Double-click to start and automatically install the relevant environment and dependencies.
Download address of the integration package in China: https://pan.quark.cn/s/41302f448cec @小天aaki ComfyUI integration package official original release address (Chinese): https://www.bilibili.com/video/BV1Ew411776J/ This method requires the use of Quark Netdisk. Since the file is relatively large, you may also need to open an additional membership, which may not be friendly to users who are not in China
How to use: After downloading, decompress and start the corresponding starter program
The network disk file is as follows
ComfyUI-aki
├── Beginner Workflow // Beginner Workflow Sample File (optional download)
├── Model // Stable diffusion model file (you can download it when you use Stable diffusion for the first time)
├── Old version // ComfyUI-aki historical version (optional download)
├── ControlNet // ControlNet model file (if your computer does not have a ControlNet model, you can download it)
└── ComfyUI-aki-v1.3.7z // Integrate package body, please download this file
Please download ComfyUI-aki-v1.3.7z
Unzip to the local directory where you want to install ComfyUI.
This step mainly checks whether the A drawing starter can run normally. Find the corresponding icon of the A drawing starter in the decompressed folder. Double-click to start Qiuye’s ComfyUI integration package. After startup, it should be automatically displayed according to your system language.
The first run may be done to download and load some environment configuration files, which need to ensure smooth network
There may be some menus that are not translated into Chinese, and the normal interface should be as follows

If your language is not displayed correctly, you can modify it in the settings

As shown in the above picture, you can set up a complete tutorial on using the Qiuye Launcher. The tutorial on using the Qiuye Launcher will continue to be updated in the tutorial on using the Qiuye Launcher.
Since @如如如aaki has made WebUI-related integration packages before, it may be because of the redundancy of model files that this integration package does not directly integrate the corresponding Stable diffusion drawing model. I will provide two methods to install the model below.
Download the provided anything-v5-PrtRE.safetensors file from the network disk folder or download the Checkpoint checkpoint model from the model site such as civitai and liblib
Put the corresponding model into the ComfyUI directory models/checkpoints folder
ComfyUI_windows_portable
├──ComfyUI
│ ├── models
│ │ ├── checkpoints // Please put the big model file here
│ └── ...Other files are omitted
│ └── ...Other files are omitted
└── ...Other files are omitted

Click the blue icon in the launcher homepage ▶︎One-click start, and you can start ComfyUI with one click. If it runs correctly, it will automatically open the console to run related scripts for you.

As shown in the picture above, when you see
Starting serverTo See the GUI go to: http://0.0.0.0:8188 // The URL here may be displayed differently on the device
This means that ComfyUI has been started successfully. If the browser does not start normally, you can access the URL after To See the GUI go to: directly. For example, in the above example, it should be http://0.0.0.0:8188
By default, the default workflow of ComfyUI will be automatically loaded after startup, as shown in the figure below

If the interface shows blank or the default workflow is not loaded, please click Load default / Load default in the menu in the lower right corner to load the default workflow
If your browser only displays the web page title ComfyUI after opening, but does not have any GUI elements, this may be that your browser is incompatible. It is recommended to use the latest version of Chrome browser
First, you need to confirm that the model file loaded in Load checkpoint in your workflow is loading normally and smoothly
If it is correct, you can click Add Prompt Queue / Queue Prompt
Wait for the run to complete, if everything goes well and the picture is generated, congratulations! You have completed the installation of ComfyUI