Table of contents
English
English
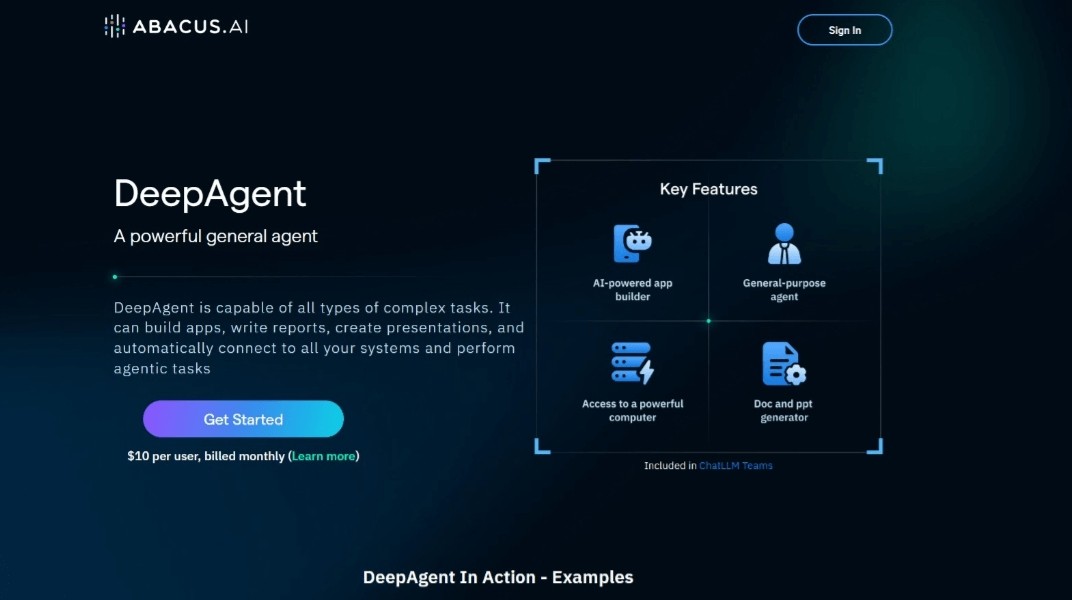
ComfyUI is a powerful node-based user interface for generating images via Stable Diffusion. Compared to other interfaces, ComfyUI provides a higher degree of freedom and a modular structure, suitable for users who want to deeply customize the generation process. Although it is more complex than WebUI, it provides users with a wealth of tools and plug-ins that enables you to create personalized build workflows.
(1) Download ComfyUI
GitHub official address: ComfyUI official repository
Windows configuration-free integration package (recommended for beginners): ComfyUI Qiuye integration package (unzip ready to use, pre-installed plug-ins)
(2) Manually install ComfyUI
Download ComfyUI
 git clone https://github.com/comfyanonymous/ComfyUI.git
  cd ComfyUI
Installation dependencies
pip install -r requirements.txt
(Make sure Python 3.10+ and Git are installed)
Download Stable Diffusion Model
SD1.5 : Hugging Face
SDXL : SDXL model
ControlNet (optional) : ControlNet model
Put the .safetensors or .ckpt model files into the ComfyUI/models/checkpoints/ directory.
Recommended model: MajicMix
Run ComfyUI
python main.py
(Windows users can directly run run_nvidia_gpu.bat
Installing plug-ins can greatly enhance the functionality of ComfyUI. The following are commonly used plug-ins:
| Plugin Name | Functional introduction | Installation method |
|---|---|---|
| ComfyUI-Manager | Node Manager for easy management and installation of plug-ins | GitHub Download |
| ComfyUI-Custom-Scripts | Enhance UI functions and optimize interface | GitHub Download |
| ComfyUI Impact Pack | Customize node packages to expand more functions | GitHub Download |
| ComfyUI UltimateSDUpcale | High-definition repair, chunk amplification | GitHub Download |
| ComfyUI-Advanced-ControlNet | ControlNet Advanced Features | GitHub Download |
| Efficiency-nodes | Optimize the process and reduce the number of nodes | GitHub Download |
| rembg-comfyui-node-better | Remove background with one click | GitHub Download |
(1) Interface Basics
Scroller: Zoom canvas
Drag the blank area with the left button: Move the work area
Double-click the blank area: Open the node search bar
Ctrl + Drag: Select multiple nodes
Shift + Drag: Move multiple nodes together
Drag the input/output port: Create a connection cable (only connect to the same type of port)
(2) Run the workflow
Click "Execution Queue" to run the current process
After running, you can view the task progress in the "Quote" in the menu bar on the left
After the task is completed, the generated image will be displayed below the interface. Right-click on the image to delete or load the workflow
(3) Loading workflow
Method 1: Click "Workflow" at the top menu → "Open" and select the .json or .png file
Method 2: Drag and drop .json or .png files directly to the ComfyUI area

ComfyUI's default SD1.5 literary graph workflow consists of multiple nodes, and the basic process is as follows:
(1) Loading model example Select the model under the ComfyUI/models/checkpoints directory
(Sample model: MajicMix realistic barley orange realistic.safetensors )
(2) Enter text prompt
CLIPTextEncode
Enter a positive prompt word (positive condition):
best quality, masterpiece, ultra high resolution, 1girl, MMN, MN, 1girl, realistic, vision, landscape, half body, close shot
Enter a negative prompt word (negative condition):
worst quality:2, low quality:2, normal quality:2, lowres, watermark, nude, mutant hands, missing arms, missing fingers, extra legs, fused fingers, too many fingers, bad hands, missing fingers, extra arms and legs
Output: Text encoding
(3) Generate latent space images
EmptyLatentImage
Set the image size (such as 512x768)
Note: According to the loading model settings, different effects are not consistent output: noise latent diagram
(4) Noise reduction sampling
KSampler
Select the sampling method (Euler a/DPM++ 2M Karras)
Setting Steps: 20
Set CFG Scale (prompt word influence): 20
Output: The latent space diagram after noise reduction
(5) Decode the image
VAEDecode
Function: Convert latent space map to visible image output: final image

(6) Save the picture
SaveImage
Save the image to the output/ directory and finally generate the image
Method 1: Download the picture and the workflow
Drag and drop workflow images to ComfyUI interface ( workflow diagram download )
Or click the "Load" button and select the .json workflow file
Method 2: Create a graph manually
Load the default literary picture workflow
Delete an empty Latent node
Add the "Load Image" node (right-click → "New Node" → "Image" → "Load Image")
Add the "Image Scale by Coefficient" node (right-click → "New Node" → "Image" → "Zoom in")
Add the "VAE Encoding" node (right-click → "New Node" → "Latent" → "VAE Encoding")
Connect the VAE encoder to the K sampler
How to use
Select the model, upload the picture, modify the prompt words, and adjust the sampling parameters
Click "Execution Queue" to start generation

(1) Use LoRA enhancement style to add the LoraLoader node, load the LoRA model to connect CheckpointLoaderSimple → LoraLoader → CLIPTextEncode
LoRA Download: CivitAI
(2) Use ControlNet to control the image to connect ControlNetPreProcessor → ControlNetLoader → KSampler
Enter line drawing or depth map to control the final composition
ControlNet pre-trained model: download address