English
English
1. Use ComfyUI Manager to install plug-in
1.ComfyUI Manager new version menu entry location

As shown in the figure, if your ComfyUI is installed correctly, the ComfyUI Manager location in the latest version of the menu interface is shown in the figure above
2.ComfyUI Manager Old version menu entry location
If the installation is successful, you should be able to see the effect of the following image after opening the ComfyUI interface (old version)
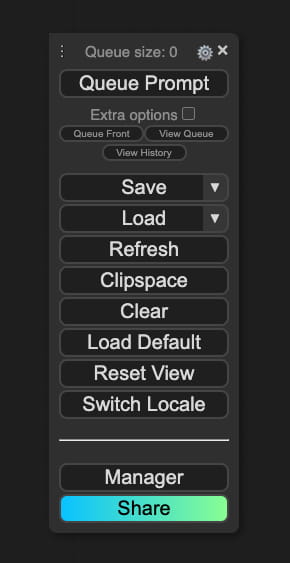
A new Manager option will be added to the options in the menu, which is the entrance to ComfyUI Manager
3.ComfyUI Manager Install Plugin
Step 1: In the pop-up ComfyUI Manager Menu, you can see the entrance to Custom Nodes Manager (install new plug-in) , click the corresponding button, as shown in the figure below
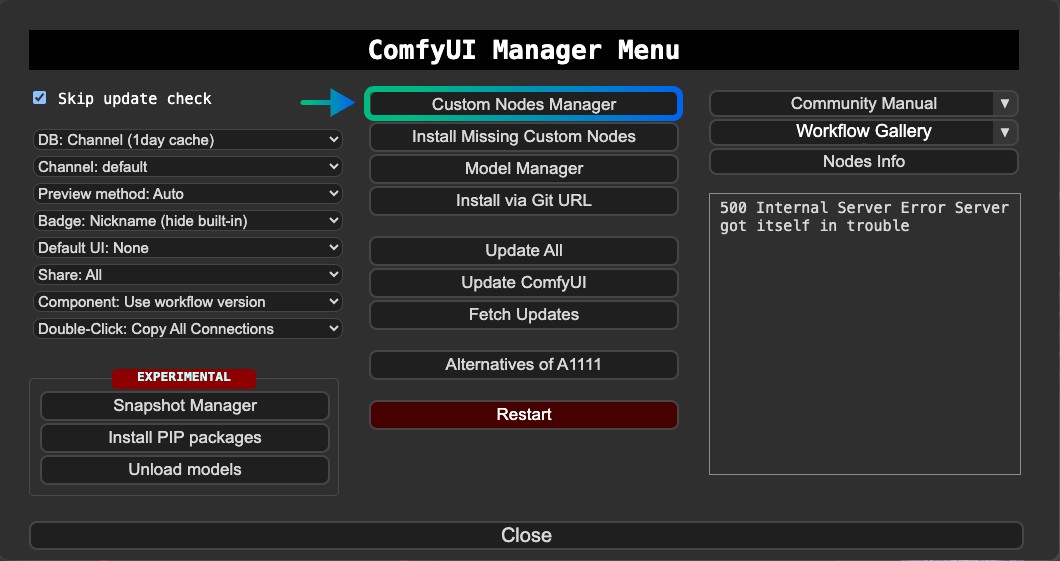
In this step, you can also click the Install via Git URL button in the interface, and then enter the corresponding Git address to install
Step 2: The following figure is the corresponding Custom Nodes Manager interface
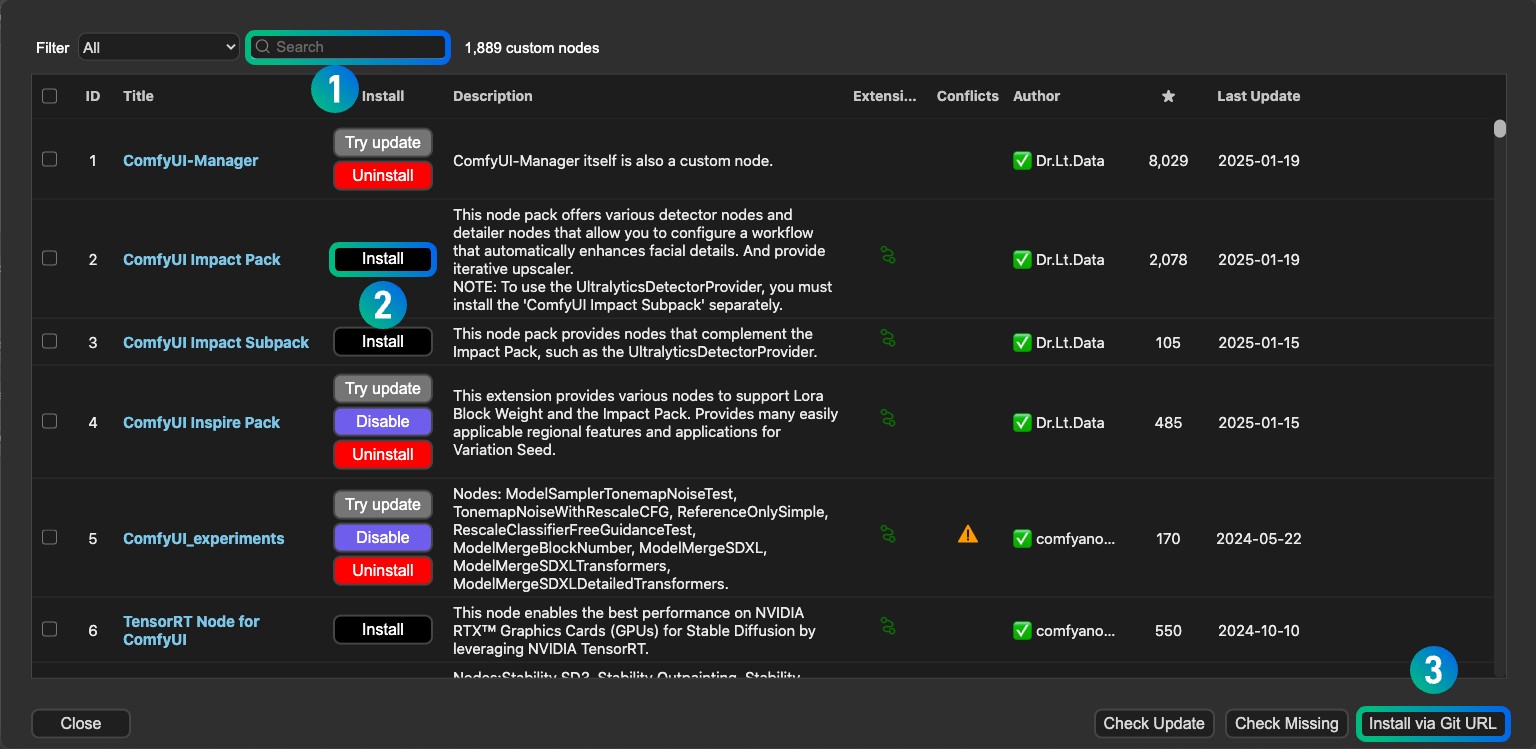
1. At 1, enter the name of the plugin you want to install in the search box, such as ComfyUI-Manager
2. At 2, find the plug-in you need, click the Install button to install it
3. At 3, you can also use the corresponding Git address to install it
4. Wait for the installation to be completed. Sometimes you may need to restart ComfyUI to apply the corresponding installation.
4.ComfyUI Manager Update Plugin
Update plug-ins are the same as installing plug-ins. Filter the installed plug-ins in the corresponding plug-in filter (Filter), and then click the Try Update button to update.
2. Use Git to install the ComfyUI plug-in
Here I will introduce two installation methods
1. Git command line installation (requires pre-installed Git recommended)
2. Github Desktop installation (relatively friendly to those who are not familiar with Git)
It is very recommended that you understand and learn about Git for a preliminary study. For details, you can check the Git installation and Getting Started Guide section.
1. Install the ComfyUI plug-in on the Git command line
How to find the Git address of the corresponding plugin
git software download: https://git-scm.com/
First find the Git repository of the plugin you want to install, such as: https://github.com/ltdrdata/ComfyUI-Manager
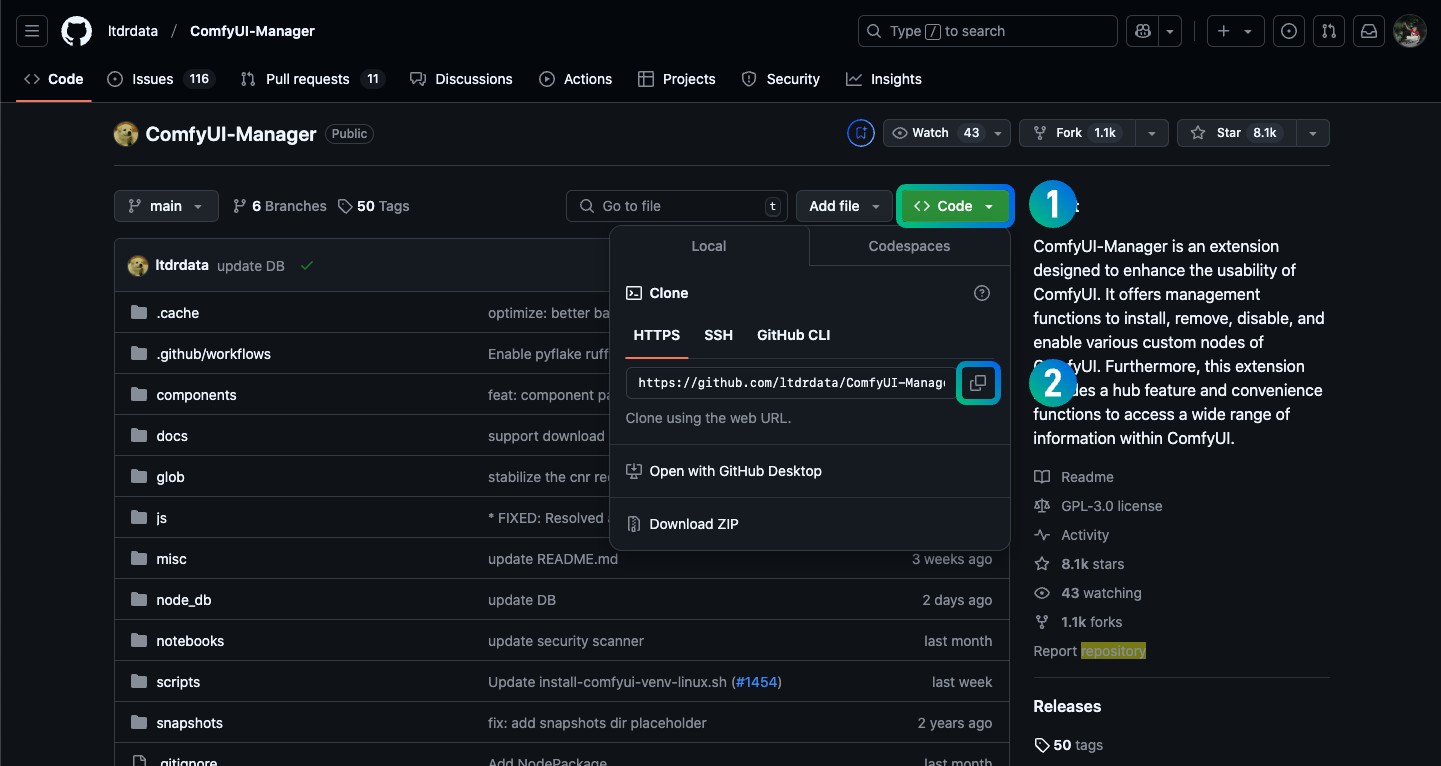
1. Click the green <>code button on the page
2. Click the copy button after the input box under the https option in the pop-up window
3. You will copy the link to https://github.com/ltdrdata/ComfyUI-Manager.git
How to install plug-ins using the Git command line
1. Open your CMD terminal, first use the cd command to enter the folder where your ComfyUI plug-in is located, such as E:/ComfyUI_windows_portable/ComfyUI/custom_nodes
cd E:/ComfyUI_windows_portable/ComfyUI/custom_nodes
2. Then use the git clone command to clone the corresponding code repository
gitclonehttps://github.com/ltdrdata/ComfyUI-Manager.git
3. Wait for the prompt for success
4. Restart ComfyUI to check whether the plug-in is installed
Note: Using Github in China's domestic environment can easily lead to failure. You can first synchronize the corresponding plug-in warehouse to domestic code warehouses such as Gitee to increase the success rate.
How to update the corresponding plug-in using Git?
 # Enter the plug-in directory cd E:/ComfyUI_windows_portable/ComfyUI/custom_nodes/ComfyUI-Manager
#Update git pull using the git pull command
2. Github Desktop Installation and Update Plugin
1. Using Github Desktop is not a very recommended way, and in fact, the mastery of Git will not be very complicated.
2. First of all, you need to register an account on github. The GitHub registration address is: https://github.com/
3. Then you need to download Github Desktop first, download address: https://desktop.github.com/
After downloading and installing, open the software and complete the corresponding account login
Install the plug-in using Github Desktop
The steps to install the plug-in using Github Desktop are as follows:
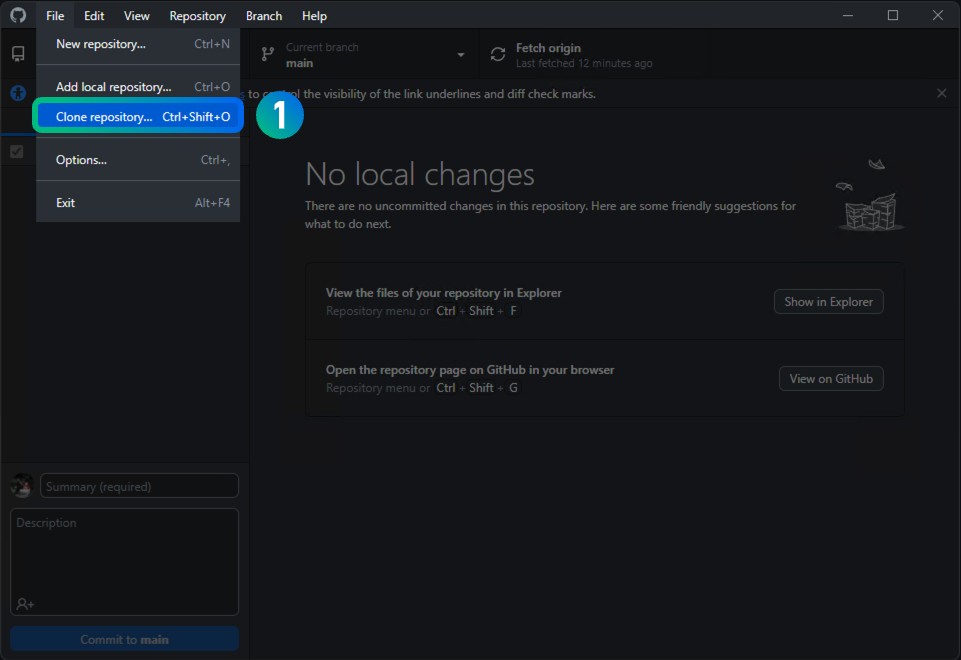
1. Click the File menu and select the Clone repository option
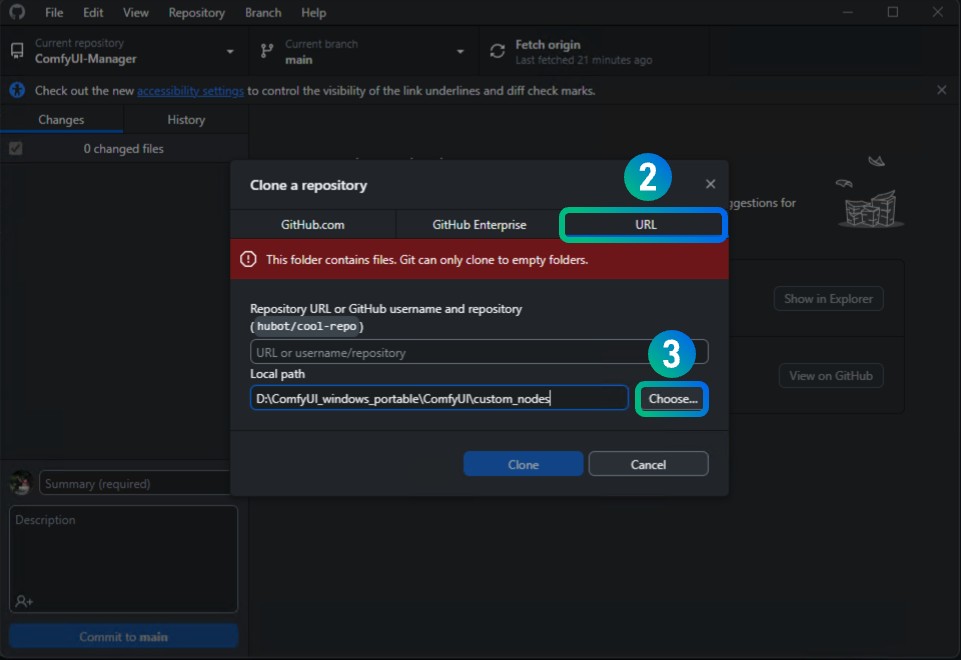
2. How to select the Clone of the last URL in the pop-up window
3. Select the directory of the plugin you want to install, usually the custom_nodes directory under your ComfyUI installation directory. In the screenshot I provided, I first set the D:ComfyUI_windows_portableComfyUIcustom_nodes directory. This is my ComfyUI installation directory.
You can see that the page will have a prompt "This folder contains files.Git Can only clone empty folders". This prompts you that there are files in this directory. Git can only clone content into an empty directory. Don't worry about this. When we enter the plug-in's Github repository address, the directory will be updated and the prompt will disappear.
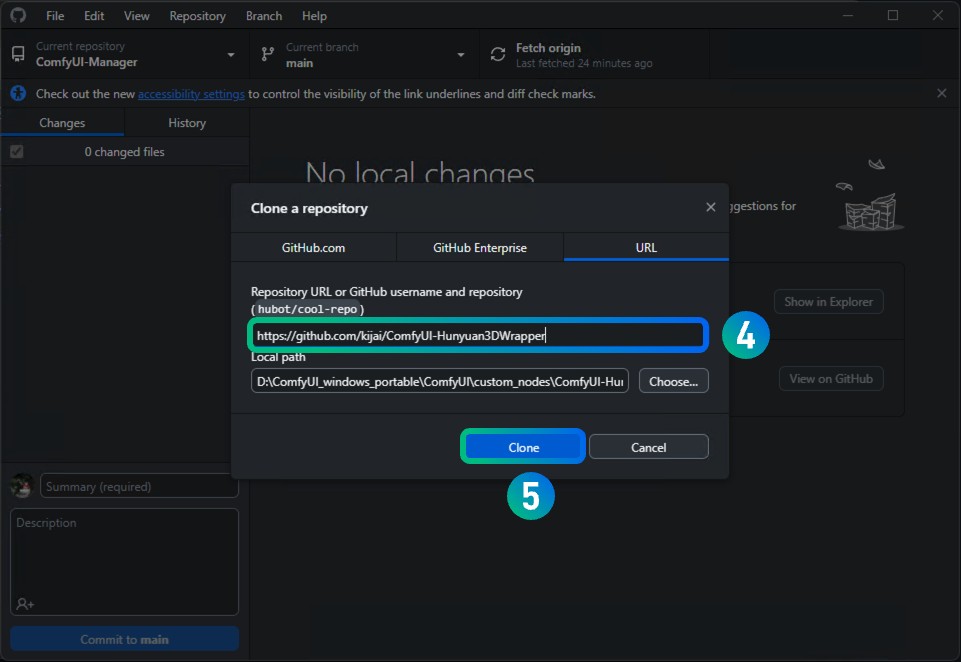
4. Enter the Git repository address of the plugin you want to install in the URL input box, such as https://github.com/kijai/ComfyUI-Hunyuan3DWrapper , you will notice that the corresponding installation directory will also be updated as we enter the address.
5. Click the Clone button and wait for the installation to be completed
Restart ComfyUI and wait for the interface to complete the necessary dependency installation, so that you have completed the installation of the corresponding plug-in
Update plug-in with Github Desktop
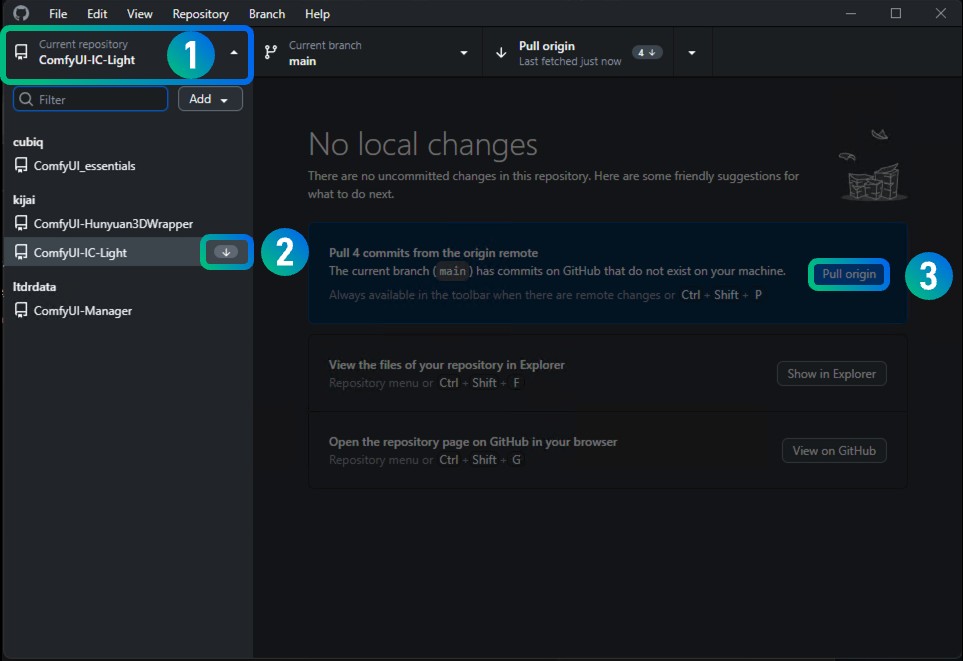
From the screenshot above, you can see that I used Github Desktop to install git repositories with several different authors
1. Click on the location marked with serial number 1, and the address of the git repository installed using Github Desktop will be opened.
2. If the corresponding plug-in is updated, you can see an arrow prompt similar to the serial number 2.
3. Click the corresponding menu and switch to the corresponding warehouse. Then you can usually see the same update prompt as in the serial number 3 in the interface. Click the Pull Origin button to complete the update of the plug-in.
3. Manual installation: Manually install ComfyUI plug-in plug-in for compression package
First access the corresponding warehouse address: https://github.com/ltdrdata/ComfyUI-Manager
Usually I don't recommend using manual installation, because information about the Git repository may be lost during this process. However, many plug-ins will have frequent updates. Using manual installation updates may not be as convenient as using Git installation.
Usually the corresponding warehouse provides corresponding Readme installation instructions, you can refer to the installation instructions for installation.
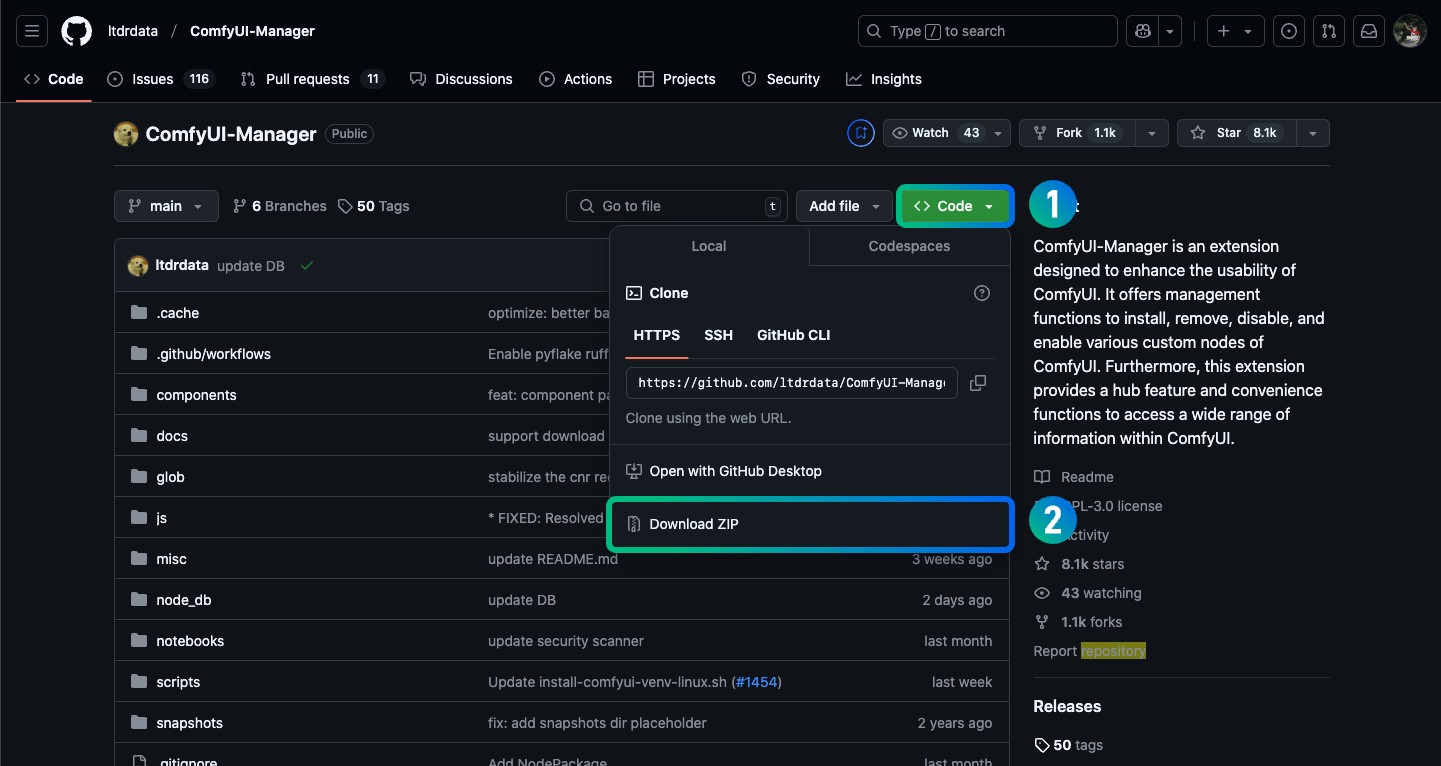
Click the green <>code button on the page
Click the Download ZIP button in the pop-up window
After downloading, unzip the compressed package
Copy the unzipped folder to the plug-in directory of comfyui/custom_nodes
Restart ComfyUI to check whether the plug-in is installed
If you want to update the corresponding plug-in using this method, you can only repeat the installation method and perform manual installation again.
4. Autumn Leaf Starter Installation Plug-in
1. Make sure ComfyUI is not running.
2. Select Version ManagementInstall Extension in the Qiuye Launcher (The following image uses the English version interface)
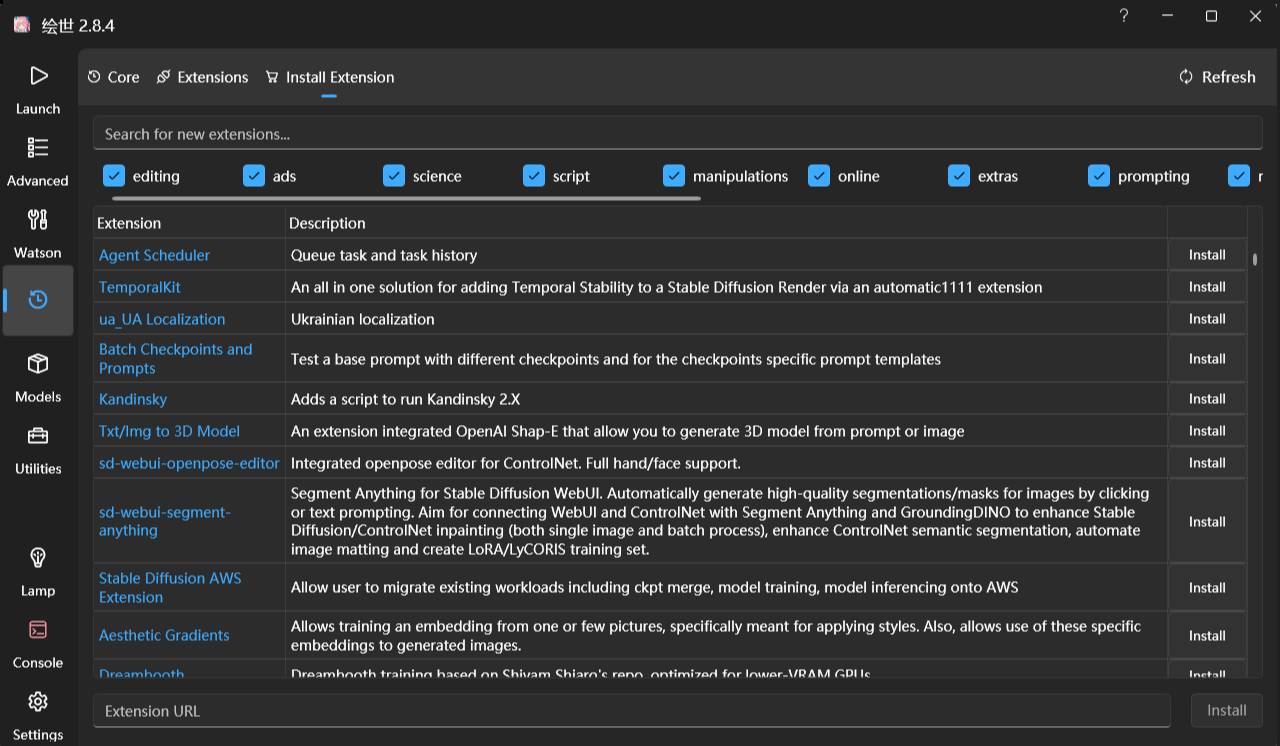
3. Search or browse to find the plug-in you want to install, click Install
4. If not, you can install the corresponding plug-in Git address here through the Extension URL of this interface, and you can use Git to install it (similar to Git installation)
How to update plugin using Autumn Leaf Launcher
Also in the Version ManagementInstallation Extension Interface, you can click Refresh to let the software check whether the corresponding Git repository has been updated. If there is an update, you can manually update or switch the version.
5. Use Gitee to clone the Github plug-in repository in China
If you are in China, the installation may fail due to Github access issues. At this time, you can use Gitee to clone the corresponding Github repository, then obtain the cloned repository address, and then use this address to install it through the above methods.
However, the disadvantages of this method are also very obvious. Since it is transferred to the Github repository, you cannot obtain the latest updates to the upstream Github repository. Every time you need to update the plug-in, you need to use Gitee to obtain the upstream updates, and then detect the updates.
First of all, you need to register an account on gitee. The Gitee registration address is: https://gitee.com/
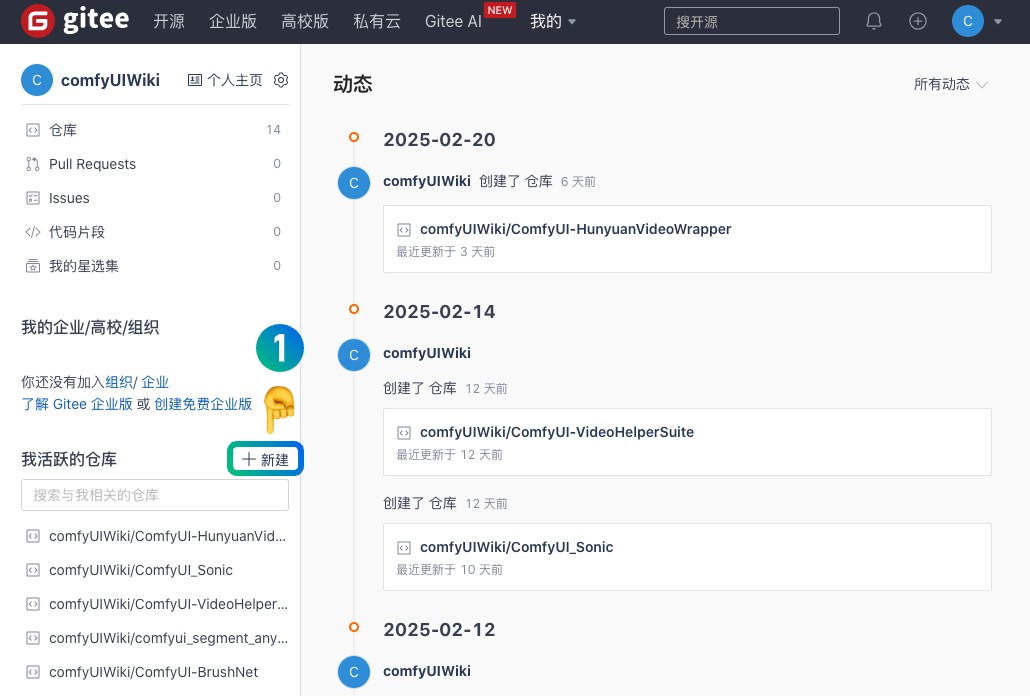
1. After registration is completed, click the + New button and select New Repository
2. Select the new repository page. Click Import option
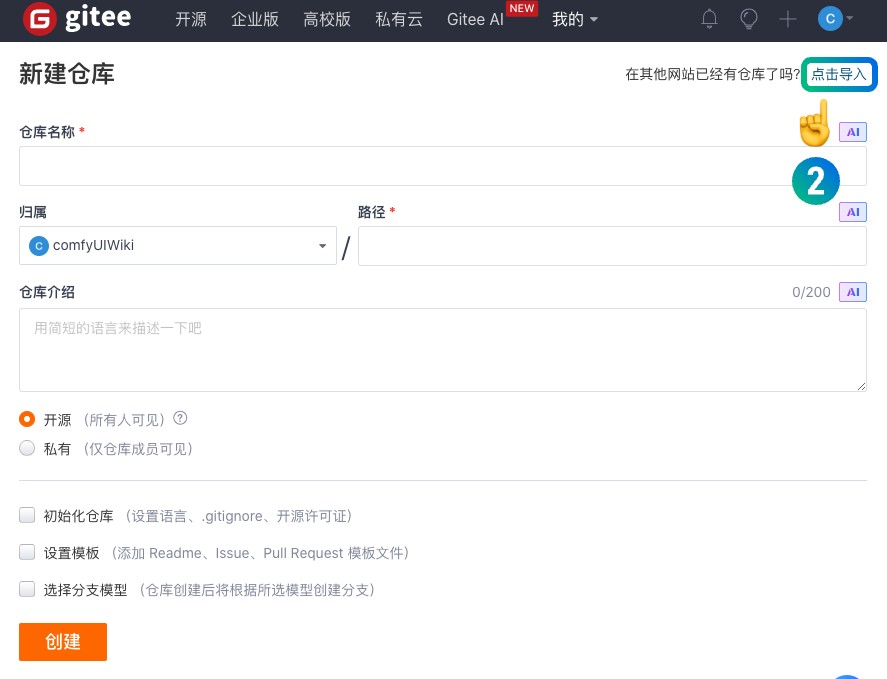
3. On the Import Repository page, select Import from URL
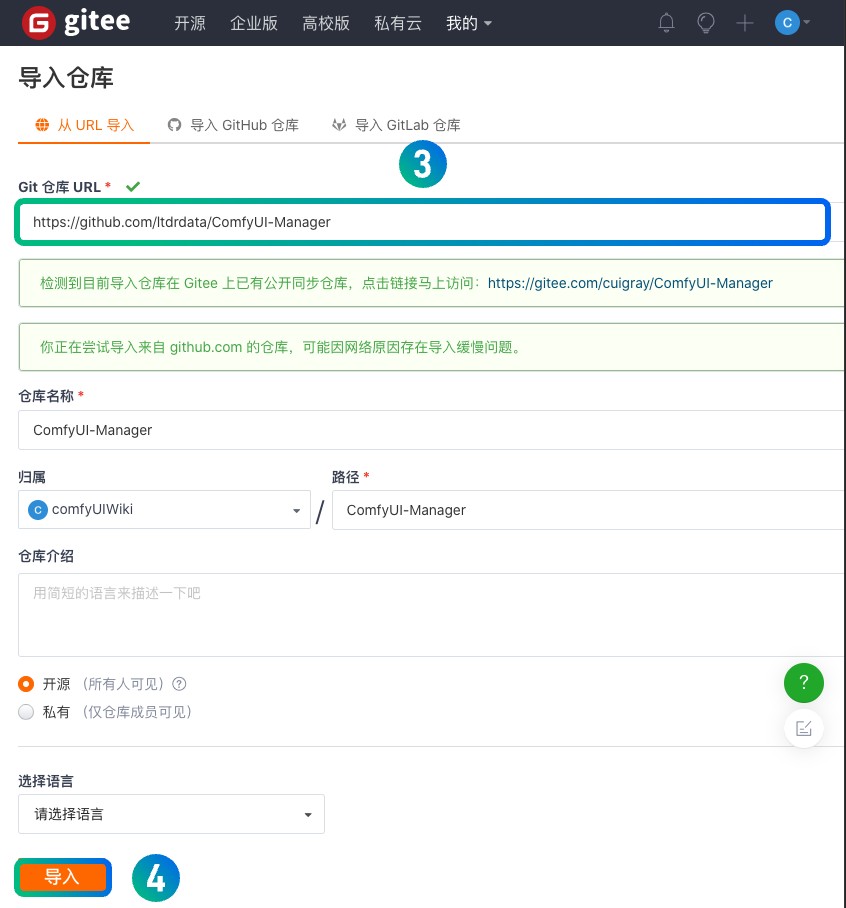
And fill in the corresponding warehouse address link such as:
https://github.com/ltdrdata/ComfyUI-Manager.git
https://github.com/ltdrdata/ComfyUI-Manager
Both formats can be accepted
4. Click Import after filling in
After the import is completed, the corresponding repository will be cloned to your account. If you want to update the plug-in code, please remember that only you update the repository you cloned first, and then you can get the upstream update.
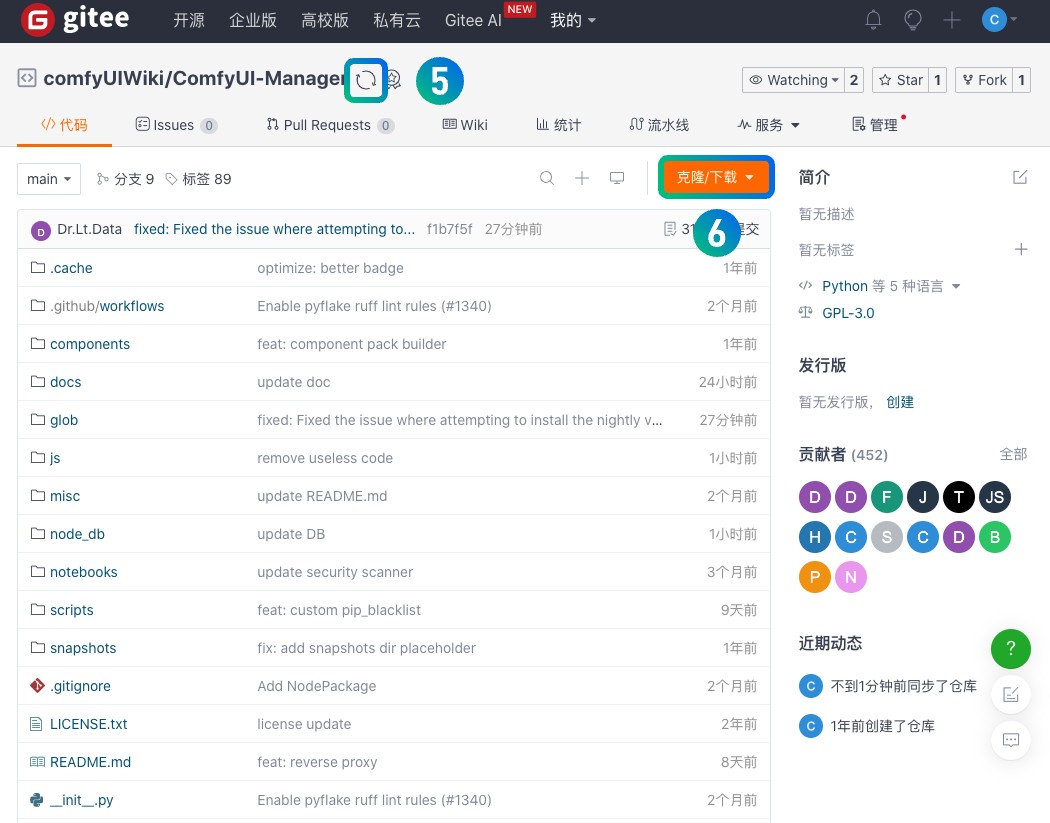
5. The button at serial number 5 is used to update the synchronous upstream repository code.
6. Click the clone/download button and you can get the corresponding warehouse address
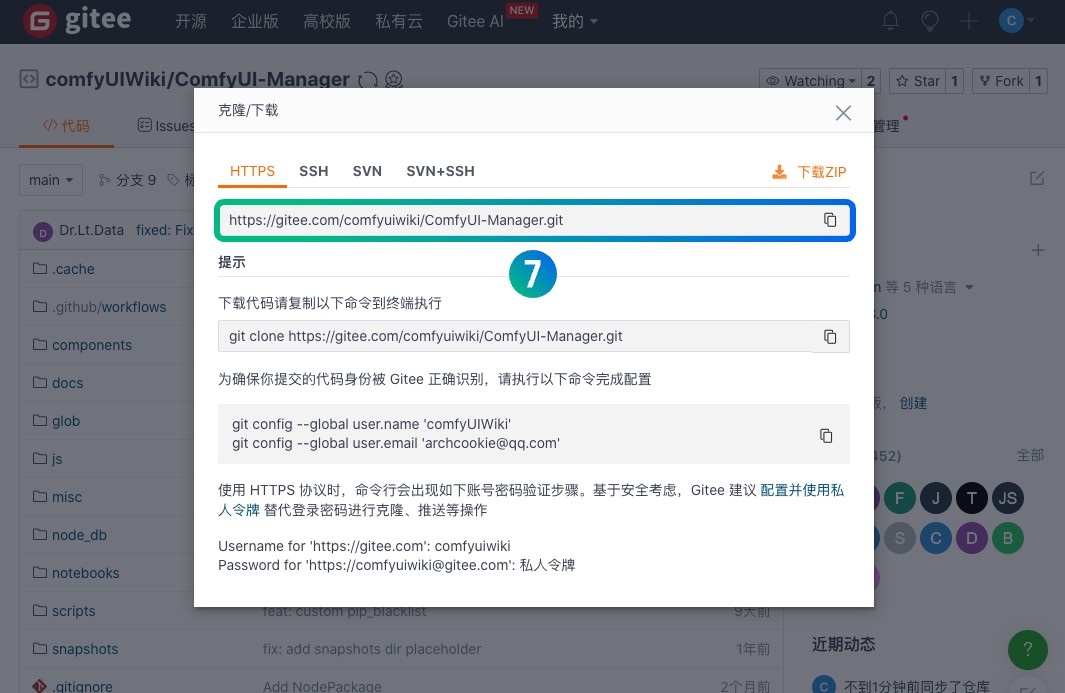
After the node is installed, in order to ensure that the functions of the corresponding node can be used normally, the corresponding dependencies need to be installed. I will supplement the dependency installation of different versions of ComfyUI. Then, for special regions such as in China, when using the corresponding dependency installation command, I need to use the mirror address in China to install it.