English
English
In the AI image generation process, it is not easy to accurately control image generation. It usually takes many times to generate satisfactory images, but with the emergence of ControlNet, this problem has been well solved.
ControlNet provides more than a dozen control network models, allowing us to further control the style, details, character posture, picture structure, etc. These limited conditions make AI image generation more controllable. During the drawing process, multiple ControlNet models can also be used at the same time to achieve better results.
You can understand that ContorlNet is a translation assistant, translating our reference diagram into instructions that AI can understand, and then passing it to the AI model to allow the AI model to generate images that meet our requirements.

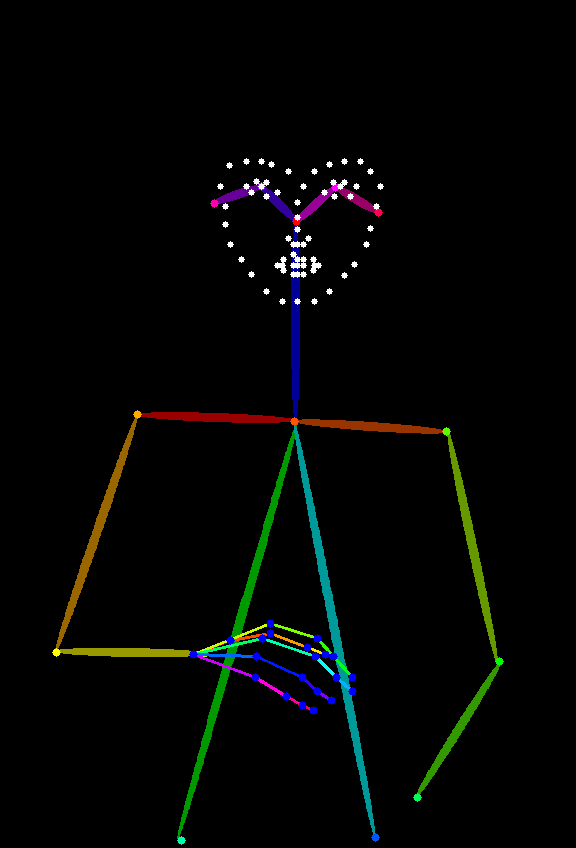
For example, in this picture, by entering a character's picture, extracting the character's control conditions through the preprocessor, and then using the ControlNet model to generate a character picture with consistent actions.
ControlNet is a conditional control generation model based on diffusion models (such as Stable Diffusion), which was first proposed by Lvmin Zhang and Maneesh Agrawala et al. in 2023. This model significantly improves the controllability and detail restoration capabilities of image generation by introducing multimodal input conditions (such as edge detection maps, depth maps, posture key points, etc.).
With the development of ControlNet and the contribution of the community in recent years, ControlNet has supported more than a dozen control types. Below are some common control types, each of which has its own suitable scenarios.
Canny: Generate fine line drawings through edge detection, which is suitable for accurately imitating the original image structure.
MLSD: Only detect straight lines, suitable for architecture, interior design and other scenarios.
Lineart: The new generation of line draft recognition is more refined than Canny and supports animation line extraction.
SoftEdge: Soft edge detection, priority recognition of large contour lines, suitable for non-precision imitation scenarios.
Scribble/Sketch: Graffiti control, supports rough outline recognition or manual sketching to generate images.
Depth: The relationship between front and back depth of field is distinguished by brightness, with the white area in front and the black area in back.
NormalMap: Normal map, controlling the concave and convex texture of the object surface (such as the window depression effect).
OpenPose: bone posture recognition, which can automatically detect or manually edit human posture.
Segmentation: Semantic segmentation, generates images by color corresponding to item categories (such as blue represents the sky).
Inpaint/Local redraw: locally modify the image to keep the style consistent with the original image.
Shuffle: Random shuffle, disrupting the semantic elements of the reference graph to generate a diversity picture.
Recolor: Black and white pictures are re-colored, and support automatic or prompt words to define colors.
IP-Adapter: Style/face imitation, maintain consistency of generated images.
InstructP2P: Modify pictures through text instructions (such as making the house "burn").
Instant_ID: AI face swaps, maintains face consistency and supports multi-picture fusion.
Tile/Blur: Blur pictures are HD and details are enhanced.
Incompatible with OpenPose face/hand special processor and partial semantic segmentation preprocessing.
In ComfyUI, ControlNet, as a conditional controller, usually involves the following steps. Of course, since there are many versions of the ControlNet model of ComfyUI, the specific process may be different. Here we will use the current ControlNet V1.1 version model as an example to illustrate the specific workflow. We will continue to add to the following related tutorials
1. Picture preprocessing
We need to upload the reference diagram, and ControlNet's preprocessor will extract the key features (such as outlines, lines, and poses) in the diagram. For example, the character image input at the beginning of this article has become the control condition of Openpose.
2. Conditional injection
ControlNet converts the extracted features into "conditional signals" and passes them to the sampler (such as the K sampler). These signals will tell the AI: "When generating pictures, try to conform to the lines/poses/structures of the reference pictures as much as possible."
3. The sampler generates images
During the process of denoising the image, the sampler (such as the K sampler) will refer to the conditional signals provided by ControlNet, and finally output a picture that meets the text description and matches the characteristics of the reference image.
This section will introduce a typical SD1.5 ControlNet workflow without relying on any third-party plug-ins
To use this workflow, make sure you have installed the following
1. Please go to download Dreamshaper 8 and save it in ComfyUI/models/checkpoints/directory
2. Please go to download control_v11p_sd15_openpose.pth and save it in ComfyUI/models/controlnet/ directory
In ComfyUI, the ControlNet model corresponding to different versions of the drawing model is not universal. For example, the SD1.5 model cannot use the Flux ControlNet model, and vice versa. So I suggest that when saving the model, you create a new folder in the corresponding directory to identify the model version, which can be more convenient when selecting the model, such as:
1.ComfyUI/models/checkpoints/sd1.5
2.ComfyUI/models/controlnet/sd1.5
Please click the button below to download the corresponding workflow, then drag it into the ComfyUI interface or use the menu bar Workflows->Open(Ctrl+O) to load
Click to download the SD1.5 ControlNet Basic Workflow
The following image will be used as a reference picture. Please download and save
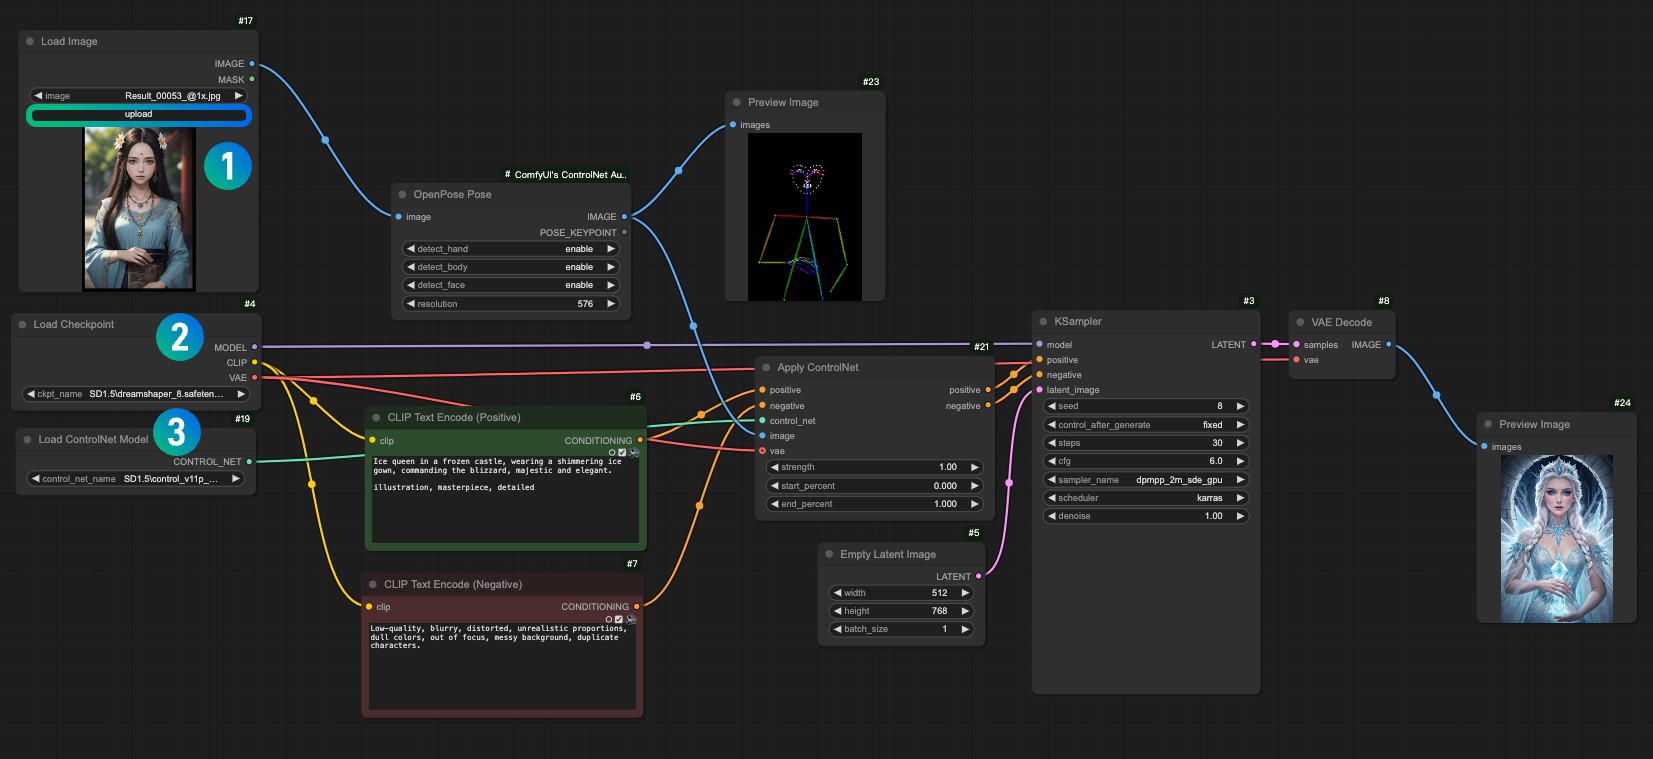
Refer to the sequence number in the picture, complete the corresponding operations in turn to complete the ControlNet workflow
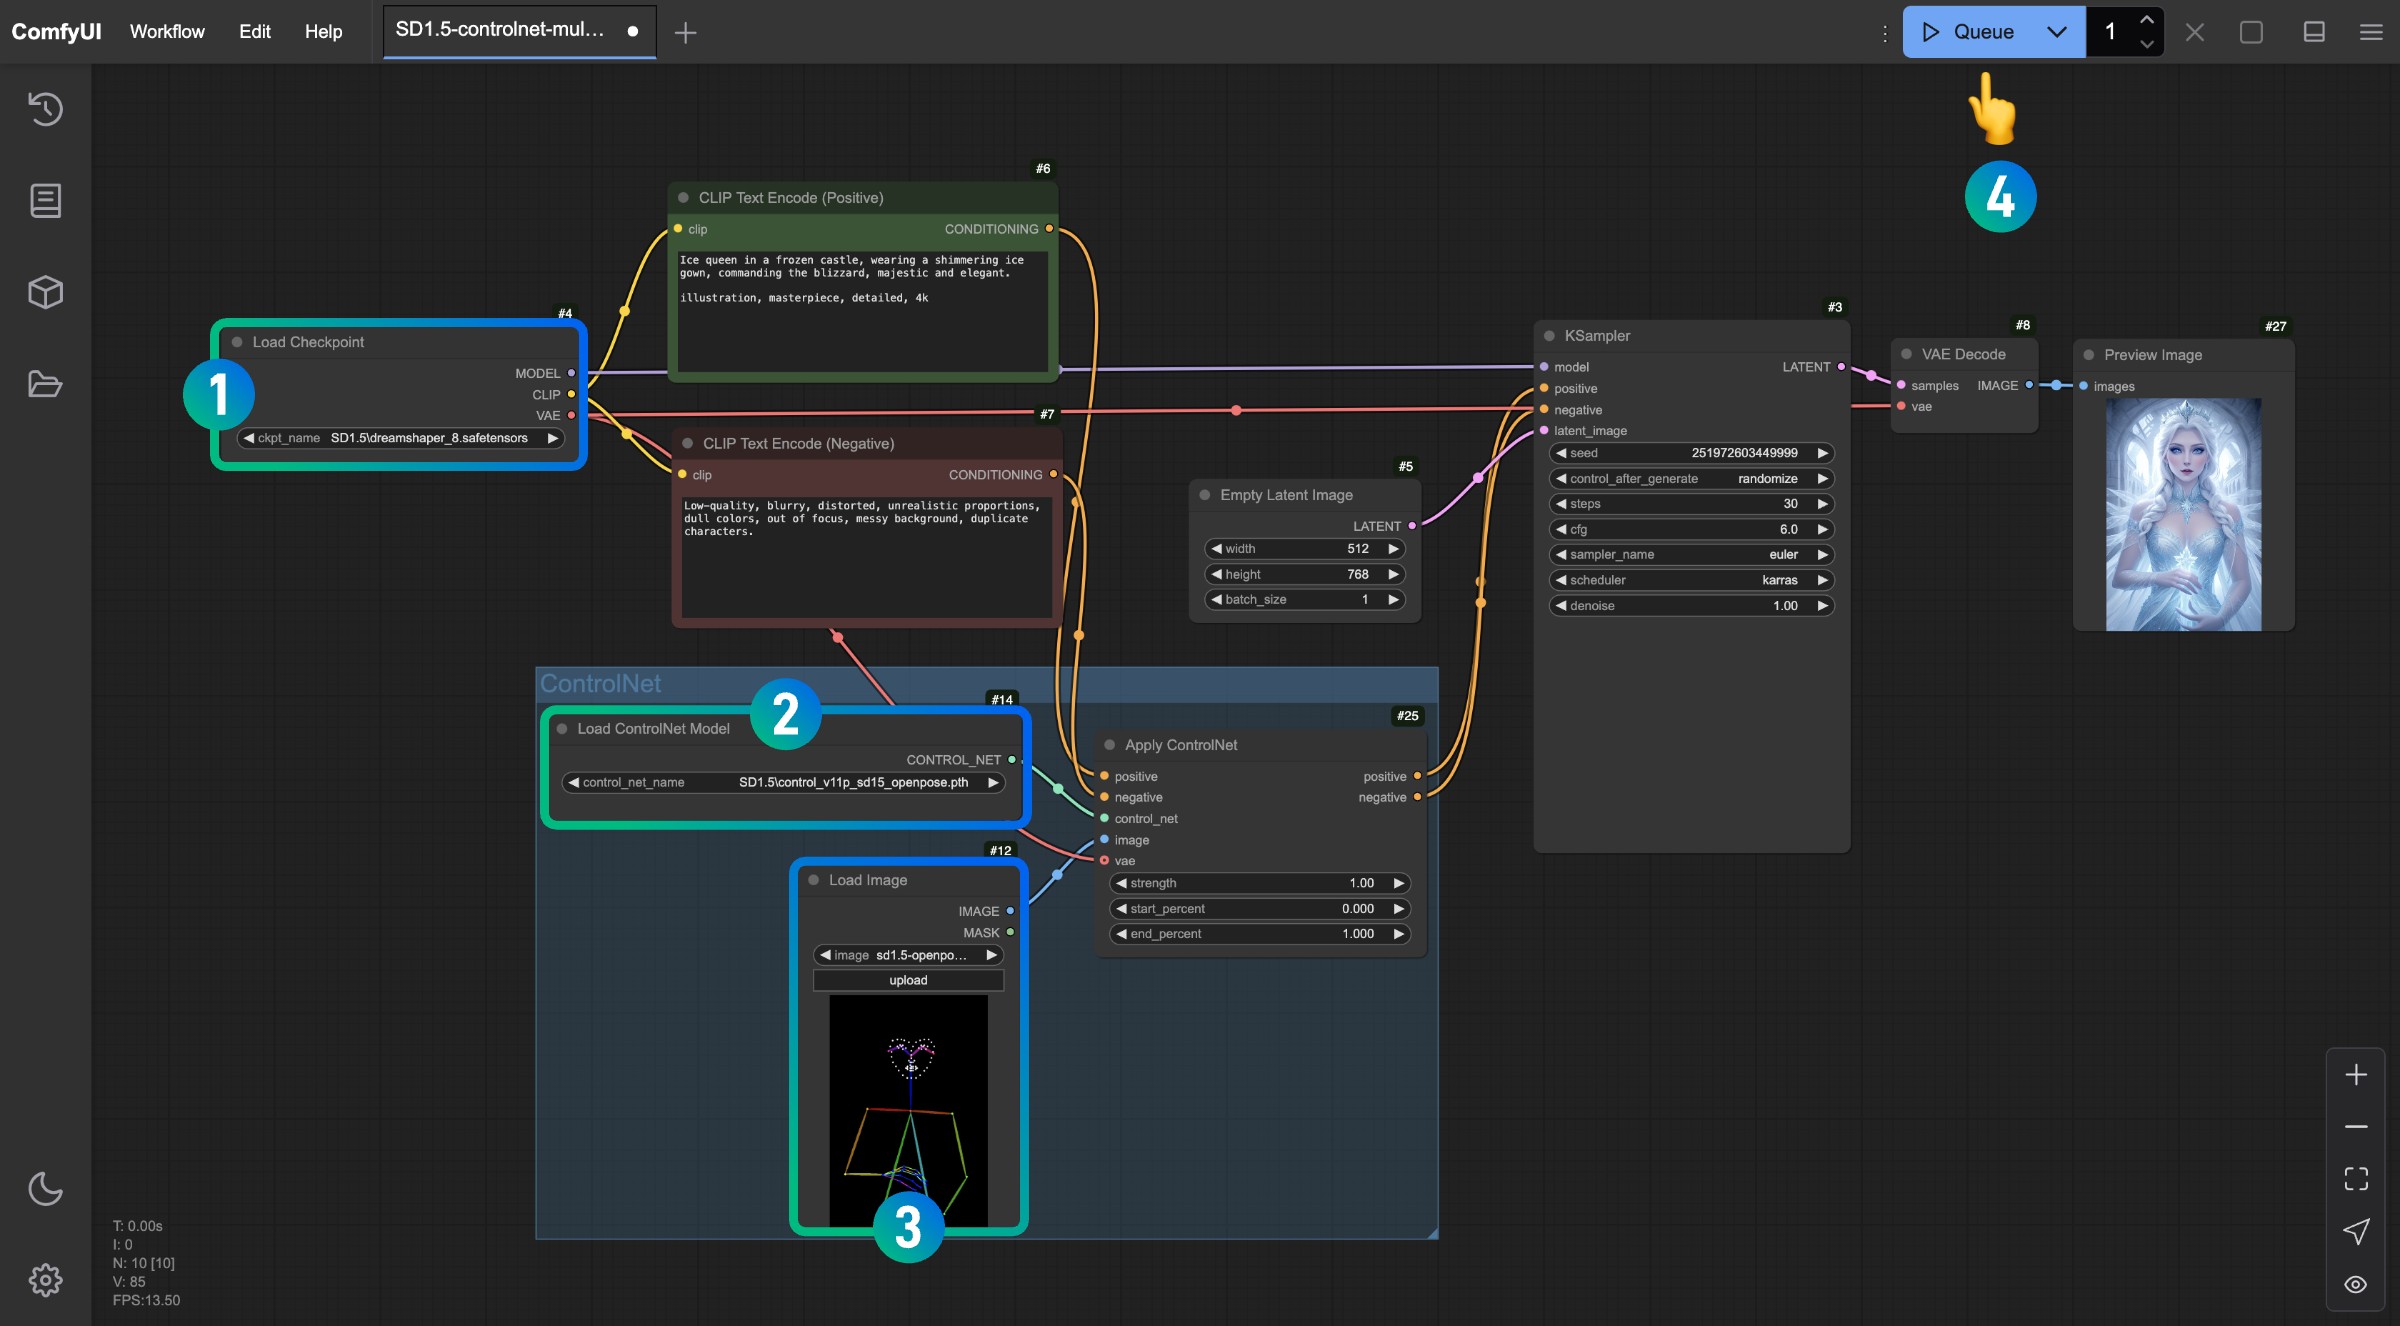
1. Please make sure that the SD1.5 model is loaded in the Load Checkpoint node.
2. Please make sure that the ontrol_v11p_sd15_openpose.pth model in the Load ControlNet Model node can be recognized and loaded
3. Load the reference image provided above in the Load Image node
4. After completing the above operations, click the Queue button, or use the shortcut keys Ctrl(cmd) + Enter to generate the image
Try to adjust the different parameters in the Apply ControlNet node, generate, and view the impact of different strengths (Strength) and different starting ratios (start_percent) and end ratios (end_percent) on the generated results.
In the above process, we compare the corresponding workflow with our literary and artistic workflow
You will find that the most important difference is that in the original literary chart, we input the corresponding conditions. The Apply ControlNet node uses this node to add the corresponding control conditions, and then input the corresponding output conditions into the conditional input of the KSampler node.
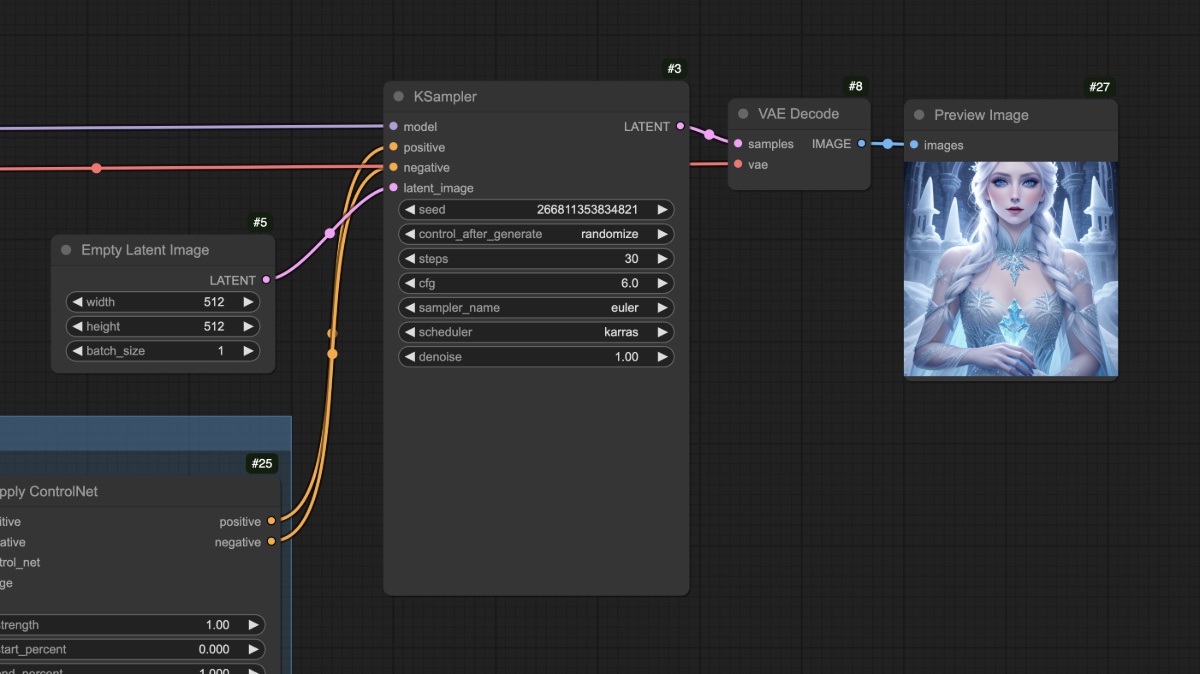
You can see that the corresponding characters are generated well, and in addition, the common physical errors in the SD1.5 model do not appear in this workflow.
After completing the above operations, you can try to modify the size of the Empty Latent Image node, such as setting it to 512x512, and then generate it again to observe the difference between the generated picture and the reference picture
You should see that the last generated image only uses the center area of the reference image. In addition, different types of reference images also require different types of ControlNet models. For example, Openpose needs to use control_v11p_sd15_openpose.pth model, while Canny figure needs to use control_v11p_sd15_canny.pth . Model.
In the above workflow, we may have a problem. The reference maps we use (Openpose) are not that common. So can we use some other common reference maps to generate corresponding images? At this time, we need to use the preprocessor, so let's continue to use the preprocessor workflow in the next part.
What is a preprocessor?
For example, in the figure below, we use ComfyUI's Canny preprocessor, which extracts the outline edge features of the corresponding image.

This is what the preprocessor does, which converts the reference diagrams we provide (such as photos, line drawings, graffiti, etc.) into a structured feature diagram so that the ControlNet model can understand and guide the generation of results.
There are many common preprocessors such as:
1. Linear draft preprocessor (such as canny, lineart): extracts the edge contour of the image and generates black and white line drafts.
2. Depth map preprocessor (such as depth_midas): calculates the distance and near levels of objects in the image and generates a gray depth map.
3. Pose preprocessor (such as openpose): identify key points of human skeleton and generate stickman skeleton diagrams.
However, in ComfyUI, there is only the Canny preprocessor, so we need to rely on other plug-ins to complete the image preprocessing work. Below we will perform the corresponding workflow content.
This tutorial requires the ComfyUI ControlNet Auxiliary Preprocessors plugin
Please refer to the ComfyUI plug-in installation tutorial for the tutorial
In this example, we can keep it consistent with some previous model files
1. Please go to download Dreamshaper 8 and save it in ComfyUI/models/checkpoints/directory
2. Please go to download control_v11p_sd15_openpose.pth and save it in ComfyUI/models/controlnet/ directory
Download the following workflow file
Click to download SD1.5 OpenPose ControlNet Preprocessor workflow
After running ComfyUI, drag the workflow in or use ComfyUI's shortcut key Ctrl+O to open the workflow file
Please download the following image and load it in the Load Image node
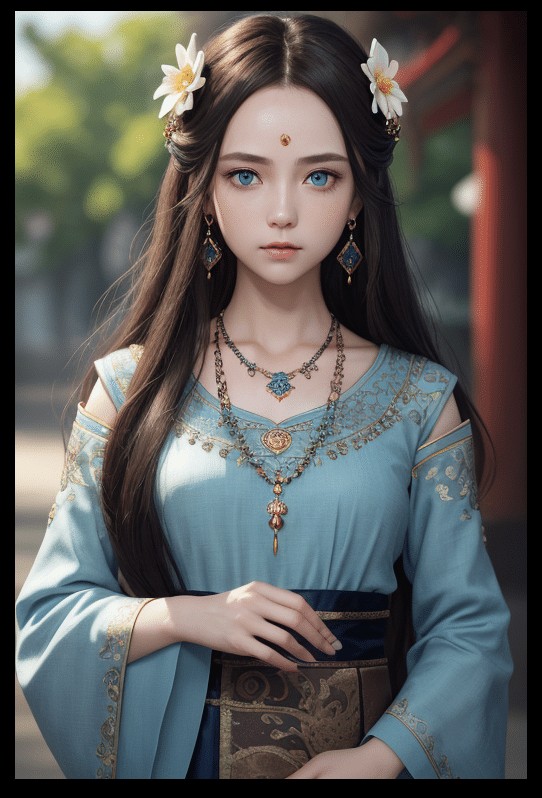
1. Load the input image in the 1 Load Image node
2. Select the model you installed in the 2 Load Checkpoint node
3. Select the control_v11f1p_sd15_openpose.pth model in the 3 Apply ControlNet node.
4. Use Queue or shortcut key Ctrl+Enter to run the workflow for image generation
Compared with the previous workflow, this workflow actually only has one more image preprocessing. We input the corresponding image into the OpenPose Pose node of the preprocessor provided by ComfyUI ControlNet Auxiliary Preprocessors , and complete the corresponding image preprocessing.
The above is a brief introduction to ControlNet in the corresponding ComfyUI. In the subsequent ControlNet related tutorials, we will continue to introduce more ControlNet models and give corresponding examples.