English
English
Depth ControlNet is a ControlNet model dedicated to controlling image depth and spatial structure. It helps AI maintain correct spatial relationships and perspective effects when generating new images by analyzing depth information of the input image. This model is particularly useful in areas such as interior design, architectural design and scene reconstruction because it accurately understands and maintains in-depth information of the space.
Space control: Accurately control the spatial depth and perspective relationship of an image
Scene reconstruction: Ability to maintain the spatial layout of the original scene while changing the style and content
Interior Design: Especially suitable for interior scene redesign and style conversion
Architectural visualization: Especially effective in 3D display of architecture and interior design
Product display: Suitable for creating product display effects with a sense of depth
Scene Planning: Helps visualize landscape design and urban planning
Since ComfyUI Core does not have the corresponding Depth image preprocessor, you need to pre-download the corresponding preprocessor plug-in. This tutorial requires the use of the ComfyUI ControlNet Auxiliary Preprocessors plug-in to generate depth maps.
Here, the tutorial for using ComfyUI Manager to install plug-in installation can be used in more detail.
The latest version of ComfyUI Desktop has pre-installed the ComfyUI Manager plugin
Install ComfyUI Manager first
Search and install "ComfyUI ControlNet Auxiliary Preprocessors" in Manager
Open the command line and use the cd command to enter the custom_nodes directory of ComfyUI
Execute the following command:
 git clone https://github.com/Fannovel16/comfyui_controlnet_aux
cd comfyui_controlnet_aux
pip install -r requirements.txt
Note: ComfyUI needs to be restarted after installing the plug-in
1. Visit https://github.com/Fannovel16/comfyui_controlnet_aux
2. Download the corresponding code repository's ZIP contains
3. Copy the unzipped file to the ComfyUI/custom_nodes/ folder
First, the following model needs to be installed:
| Model Type | Model File | Download address |
|---|---|---|
| SD1.5 Basic Model | dreamshaper_8.safetensors | Civitai |
| Depth ControlNet Model | control_v11f1p_sd15_depth.pth | Hugging Face |
| VAE model (optional) | vae-ft-mse-840000-ema-pruned.safetensors | Hugging Face |
The SD1.5 version of the model can use the model on your own computer, but this tutorial uses dreamshaper_8 as an example. If it is an interior design and other fields, you should choose a model specially optimized for interior or architectural design.
Please place the model file in the following structure:

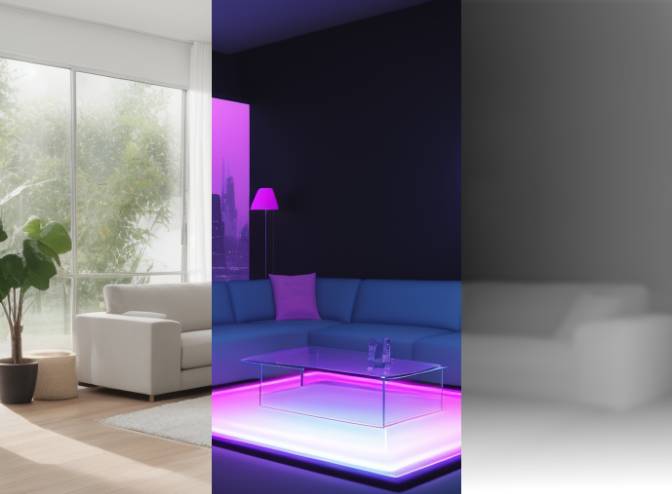
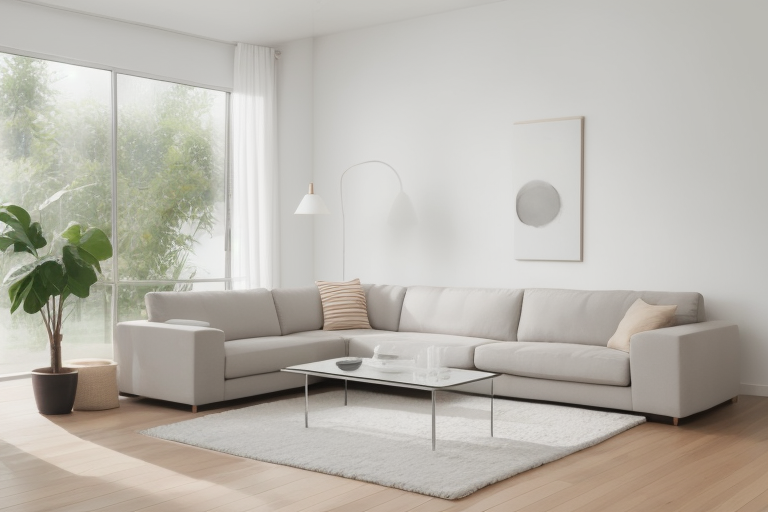
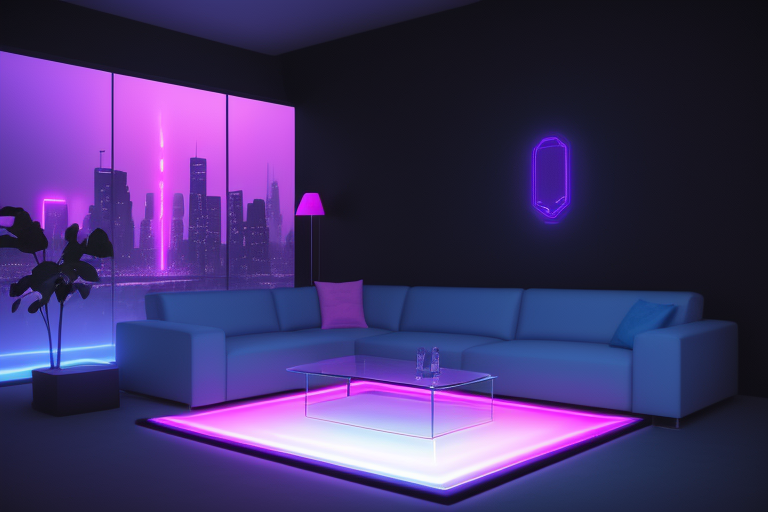
Interior design is one of the most common application scenarios of Depth ControlNet. Through the control of depth information, the original spatial layout can be maintained while completely changing the style and atmosphere of the interior.
Here is an example of converting a traditional living room to a cyberpunk style:
SD1.5 Depth ControlNet Workflow
This workflow uses the following key nodes:
1. LoadImage: Load the input image
2. Zoe-DepthMapPreprocessor: Generates a depth map, which is a node provided by the ComfyUI ControlNet Auxiliary Preprocessors plug-in
1.resolution: Controls the resolution of the depth map. This parameter will affect the fineness of the depth map:
Larger resolution (such as 768, 1024):
Advantages: Capable of capturing multiple details, better for complex indoor scenes and buildings
Disadvantages: Slow processing speed, occupies more memory
Applicable scenarios: recreation of fine interior design and architectural details
Smaller resolution (such as 384, 512):
Advantages: fast processing speed, less video memory
Disadvantages: Some details may be lost
Applicable scenarios: quick preview, simple scene reconstruction
Recommended settings:
General Scenario: 512 is a better balance point
High details requirements: 768 or higher
Quick Test: 384
2. Using Zoe depth estimation algorithm, high-quality depth maps can be generated
3. Especially suitable for indoor and architectural scenes
4. The generated depth map can be previewed through the PreviewImage node
Tip: It is recommended to use a lower resolution for testing and adjustment first, determine other parameters before increasing the resolution for final generation.
Tip: Zoe-DepthMapPreprocessor is one of the most suitable depth map generators for architectural and indoor scenes. It handles complex spatial structures and details well
Function: Control the fineness and quality of the generated image
Suggested range: 25-30 steps
Parameter description:
Higher step count (30+): generates finer details, but takes longer
Lower step count (20-): Fast generation, but may lose details
It is recommended to have no less than 25 steps to ensure the accuracy of the spatial structure.
Function: Control the degree of matching between generated images and prompt words
Suggested range: 6-8
Parameter description:
Higher values (8+): Follow prompt words more strictly, but may affect creativity
Lower value (5-): more creative, but may deviate from the original intention
6-7 are recommended for interior design scenarios to balance accuracy and creativity
Recommended choice:
euler: fast speed, suitable for quick preview
dpmpp_2m: Good quality, suitable for final generation
Different scenarios:
Interior design: priority is used dpmpp_2m
Quick Test: Use euler
Recommended to use: karras
Reason: The best effect on maintaining the spatial structure
Function: Determine the degree of influence of depth information on the generated results
Suggested range: 0.8-1.0
Scenario suggestions:
Interior design: 0.9-1.0
Building appearance: 0.8-0.9
Simple scene: 0.7-0.8
Function: Control the scope of the depth guidance in the generation process
Default settings:
start_percent: 0 (Apply control from the beginning)
end_percent: 1 (main control throughout the process)
Special circumstances:
If you want to allow more creative changes later in the generation, you can set end_percent to 0.8-0.9
If you want to maintain a strict spatial structure, it is recommended to keep the default value
Tip: These parameters can be used in combination, for example, when designing interiors, you can use higher strength (0.9+) and higher steps (30+) to get the best results.
The main node connection instructions for this workflow:
LoadImage → Zoe-DepthMapPreprocessor → PreviewImage (used to preview depth map)
LoadImage → Zoe-DepthMapPreprocessor → ControlNetApplyAdvanced
CheckpointLoaderSimple (Loading the basic model)
ControlNetLoader (Loading Depth ControlNet)
CLIPTextEncode (process positive prompt words)
CLIPTextEncode (process negative prompt words)
KSampler (control the generation process)
VAEDecode (convert latent space image to final image)
Using high-quality input images
Ensure that the image has clear spatial hierarchy
Avoid overly complex scenarios
Pay attention to the effect of light on depth map
Describe the spatial relationship in detail
Contains material and lighting information
Identify important depth elements
Improve the quality of generation using professional terms
Recommended keywords:
Space words: depth, perspective, spatial layout, composition
Quality words: professional, high quality, detailed, realistic
Style words: modern, minimalist, futuristic (select according to your needs)
Insufficient space: Increase strength value
Lost details: appropriately reduce cfg value
Structural deformation: increase the steps value
Inaccurate depth: adjust resolution value
The wrong style: Optimization prompt word description
Check whether the depth map is clear
Confirm whether the strength value is high enough
Consider increasing the steps value
Use higher resolution
Choose the right sampler
Optimization prompt word description
Resolution
Use faster samplers
Reduce the sampling steps
Increase strength value
Keep end_percent as 1
Use more detailed spatial description